Showing posts with label Article- Reconstruction Tips. Show all posts

Thursday, May 27, 2010

Reconstruction Tips: Flukes Part 4

Yet another installment of...

Craig brings you the next chapter of his...

Flukes go on Whales... NOT in your Art!


Part: 4

Flukes of times past...

Part 1- I decided to try and create some palaeo-art for New Zealand Palaeontologist Ewan Fordyce. This was unrequested art, and this is probably a good thing considering what I first produced! Find out the HUGE mistake I made and the first lesson you should learn from my folly.

Part 2- After regrouping from my first embarrassing version of the Shark Toothed Dolphin, I proceeded to try and rework it. However in this second attempt my strengths and preferences working on Dinosaurs created an odd reptilian-whale hybrid. This has yet another key lesson to learn here.`

Part 3- Tracking down as many references as I could get my hands on, I reworked the "Dolphinsauriod" into something that roughly resembled a Shark Toothed Dolphin! Find out how important references were to my process...

Now for Flukes of times present!

So I'd managed to get my Squalodon looking something like a Dolphin should. Showing it to Dr. Fordyce I got my first passing grade on the restoration! It got a C- so to speak. All the details were wrong, but I'd gotten the general layout right. Which was a first!

However my set of renders were not overly helpful for Dr. Fordyce to go into the models details. Like this one above, all my renders were in a 3D environment, which I quickly learned weren't useful for critiques. I was going to need something better for the good doctor to look at...

This is the format I came up with. A schematic of my Shark Toothed Dolphin from ever basic view available.

Rule #5 of Scientific Restorations: Before getting your piece reviewed by an expert make sure you prepare some easy to approach material for them to look at. If you can (or have the time to) make a schematic view of your creature. This allows the expert to look at preciously what you are doing in your restorations, and thus give you useful feedback.

Dr. Fordyce much preferred these to my original in water shots.

I for the first time got some immediate feedback directly on my model. Before I'd been given some verbal suggestions, but with print outs of the schematic Dr. Fordyce could directly mark where and often what he wanted the Dolphin to look like.

So with these modifications in mind I set off to work on upgrading my mark ;P

By this point in late 2009 I had been making some big breakthroughs across the board in my 3Ding (in large part thanks to ART Evolved). I now had a better method of creating underwater effects, which I promptly plopped my Squalodon into.

By now I also had a firm grasp on 3D rigging, so the Shark Toothed Dolphin became my first model to be rigged by a single skeleton! (I typically rig each part separately, and simply pose them relative to each other).

Even before Dr. Fordyce's changes, my Squalodon was starting to look pretty sweet!

With the changes this is what it looked like. I hadn't managed to get in the neck folds Dr. Fordyce had wanted (and I still haven't...), but tried to tweak everything else.


IMG_2869

I got a B. Which was huge for me. Still not publication worthy, but Dr. Fordyce was starting to believe he might want to use my Squalodon for his description!

I got a very cool anatomy lesson on the very precise details of how he thought these whales went together. From this point I was armed with the most up to date view on Squalodon ribs, flippers, and echo locating melon organ.

This was the "final" version (at least as of the time I write this).

Panorama 13

Before I took this version in to Dr. Fordyce I wanted to test out my than new direct fossil comparison technique. This was the second 3D model I tried it on.

So taking the skull above, I cut it out of this photo and than laid it over my model semi-transparent.

I was amazed to discover it was a perfect match! Through my hard manual work, and input from Dr. Fordyce, I'd modelled my Dolphin exactly in line with the fossil. Even most of the teeth were the same! Though I will never be waiting to the end of the modelling process to do this test ever again!!!

Showing it to Dr. Fordyce, I got the highest mark to date. An A-!!!

Apart from the neck wrinkles and removing some of the model induced lines from the skull area, this Squalodon met with Dr. Fordyce's standards!

It was now time to develop a scene for this critter to steal!

Building some test Penguins I toyed with updating the main picture of Squalodon used at the University of Otago. Sadly, Dr. Fordyce has asked me not to post this picture, but it is of two (older style) Squalodons chasing some of the giant penguins that lived alongside them.

This was the "final" test shot I came up with. In principle Dr. Fordyce rather liked it. Some of the scene, like the Dolphin, need some fine tuning (the bubbled and Penguins basically), but overall this is the direction I'll be going in with the final piece.
`
This is now currently where the project stands. It has been on pause since December 2009. When is the final piece due? I hear you asking. We are not sure.
`
At moment I need to do some work fixing the Squalodon's neck, but overall we are awaiting Dr. Fordyce getting the chance to finish his publication. However hopefully that day will come soon. Until it does though, I'm forced to leave you and Flukes on this art note.
`
Don't despair though. I have a side part to Flukes about my experience working with Dr. Fordyce, and some suggestions on how to start doing work for actual palaeontologists. So watch for this Going Pro edition of Flukes soon!

Monday, April 12, 2010

Reconstruction Tips: Make your own skeletal references!

Alright artists time for...

Today brought to you by your friendly host Craig...

Hi everyone. My tip for today is how to make any skeletal reference work for you.

When trying to construct a scientifically accurate critter it is really important you stick to the proper anatomy of the animal. This means that being (pretty) precise on rough measurements and proportions of your creature are key. The best means to get these right is to use a skeletal reference.

However typically when you find such a reference it isn't quite what you need (if one exists at all!...).

I personally run into problems with pre-existing references as they are often in highly stylized poses, such as this Deinonychus skeletal reconstruction by Gregory Paul. These types of references though having excellently measured proportions and anatomical layout, make it hard for you to acquire useful information about how your animal is put together as the limbs are all folded up and angled in "weird" ways (okay not weird for the living animal [most of the time! sometimes people do impossible things in their skeletals]. However when trying to measure and compare proportions they are less than ideal!).

Further more if your reconstruction is in an unconventional pose, such as my 3D Deinonychus, it is really unlikely you'll find a reference already in your pose. In fact if you do find one odds are really good it is an over done conventional pose anyways!

Meaning if you want to compare your creation directly to a skeletal, you're almost certainly out of luck. Or you'll be forced to copy the preexisting pose. Which I urge you not to do! Too many people keep turning out the same general reconstructions. With an extra 20-30 minutes work you can come up with a reference that can be in any pose you'd like!

So how do you do get this personalized skeletal reference? Why you make it yourself of course!

I'll take you through how I made the reference that I used to cross check my 3D Deinonychus here. Now the pose I'm going for is essentially a dead laid out animal (needed for my 3D posing system), but you can use this procedure for any pose you want!

Okay so the first thing you'll need to do is load your reference into photoshop. I suggest right away saving it as a new file just in case. That way you have the original still at hand should you need it.
`
1. Your first real step is carve apart the parts of the skeleton that are at the wrong angle for your purposes.

Some general tips:

Make sure your taking things apart at the joints. You can also take them apart a lot more thoroughly than I have here. Each vertebrae and digit bone can be separated if you want. I haven't gone this far, but you'll note I did separate a few individual neck verts.
`
Think about giving each separate bone or limb its own raster layer in photoshop. This makes it easier to manipulate them one at a time, and not risk wrecking your other parts by accident.
`
2. With your picture editing software's "Free Rotate" function manipulate your individual bone elements to your desired angles.

Some general tips:

Learn your undo hotkeys for this stage. As it can take some trail and error to get things to look right.
`
Have a protractor on hand if your program only allows manipulation by typing. (Some photo editing programs will have nice built in rotation tools that you can with your mouse just twist selections around in your drawing window. Sadly my version of Coreal Paintshop Pro only allows me to rotate things by manually typing in the number of degrees I want it to rotate by. Thus I can not be as precise to start off with unless I have a protractor to look at)

Once you have your piece oriented roughly how you like, lay them out close to their final position to double check. Here is where separate raster layers can be handy, as you can lay them out in their final position, and move them after the fact if you don't like them.
`

3. With your parts oriented correctly put them all back together!
General tips:
`
Keep a copy of the original picture handy, so that you can make sure you are repositioning all the joints back in exactly the same place.
`
If you were using separate layers save a copy of your skeleton in a layer supporting file format. That way you can repose this skeleton again in the future if you ever revisit it!
Okay so once you have your own version of the skeleton you can use it to your hearts delight.
`
The way I use it, handy for anyone working in digital medium, is my transparency overlay technique (which you can read all about here), seen here.
`
In my case having built my raptor before I had the skeletal reference, I could now see I needed to fix it...
`
Just like that my 3D Deinonychus was pretty much spot on (with a few tiny variations, but I'm fine with 90% accuracy... the animals would have all varied individual to individual anyway).
`
Outside of my example I'm hoping you can see applications for this technique in your own work!
`
On the last topic of what if there is no pre-made skeletal reference for your current animal project?

Well if you have a half descent photo of the actual fossils, my technique works just fine on them too!!!

So good luck in the future with your own skeletal references!

Wednesday, December 23, 2009

Reconstruction Tips: Flukes Part 3

We present for you yet another edition of...

Time for another installment of Craig's ongoing palaeo-art (mis?)adventure...

Flukes go on Whales... NOT in your Art!
Part:3

Previously on Flukes (imagine catchy suspense music, just like an awesome cliffhanger multi part TV show)
`
Part 1- I decided to try and create some palaeo-art for New Zealand Palaeontologist Ewan Fordyce. This was unrequested art, and this is probably a good thing considering what I first produced! Find out the HUGE mistake I made and the first lesson you should learn from my folly.
`
Part 2- After regrouping from my first embarrassing version of the Shark Toothed Dolphin, I proceeded to try and rework it. However with this second attempt my strengths and preferences from usually creating Dinosaurs created an odd reptilian-whale hybrid. This has yet another key lesson to learn here.
`
Now the continuation...
`

So after two months of playing with my Squalodon, I ended up with this the "Dolphinsauriod"...
`
At the time, I just viewed this particular incarnation of the model as just another mistake.

Looking at it now, the Dolphinsauriod marked the end of an era in my art. This was my last truly amateur approaches to reconstructions. As of April 2009 onward I would use one sort of reference or another when recreating anything, and thus have some degree of credibility in it.

However when starting the project in early 2009 I did not have many references for Squalodons. Even now having done extensive research on the family I've only managed to come up with a dozen or so. Of those only a few are worth looking at.
`
Bringing me to the first lesson of today's post...
`
Rule #3 of Scientific Restorations: There is no such thing as "enough" references. Track down as many pictures, drawings, photos, and restorations of a prehistoric subject's skeleton, body, and fossils. There is always another aspect or idea to be found in a new reference (even if it is just not to do it like a different recreation), so get as many as you possibly can!
`
This can be hard with less popular and obscure critters, like say Shark-Toothed Dolphins. So I'll take you through the useful references I managed to track down, and why I thought they were worth looking at.

There were several overly simplistic restorations, and of these I found this cover page by Alton Dooley for his description of Squalodon whitmorei to be any good.

Though the prey dolphins in this particular piece are a little too minimalist to reference, the Squalodon chomping down on them is surprisingly accurate. The overall proportions of the skull, fins, and body are all perfect. Making this useful for scaling my model.

If for nothing else, this picture also gave me some confidence. If this was among the top 50% of Squalodons out there, then I had a good shot at creating a new addition to this elite group of artwork.

Perhaps the most influential of all Squalodon recreations was this one by Geoffrey Cox. This comes from his amazing little popular science book Prehistoric Animals of New Zealand. (Though sadly out of print, this book is by far one of the best ever released on New Zealand fossils, and definitely has the best palaeo-art to accompany it. So if you are interested in the subject try to track down a copy).

I consider this the "type specimen" artwork of Squalodon from which most other palaeo-art restorations are based. Often in palaeo-art I find that someone will do one key version of an animal, and then 90% of later artists approaching the same subject tend to copy or borrow heavily from this first "type specimen". I'm planning on doing a post on this phenomenon later, but that is the general idea.

One of the most clear examples of this derivative referencing (which is not necessarily a bad thing, I point out, but it is just important to acknowledge) is Arthur Weasley's Squalodon from wikipedia. It is a nice piece, but where it is accurate it incorporates all of Cox's features.

Weasley's body and fin proportions are not very well measured, and so I didn't really use this picutre at all. It is worth crediting this piece with a pretty accurate skull though. At the same time I didn't use it as it rehashs all of Cox's ideas. It has the same skinny long slender snout, and the relatively spherical melon organ (what makes a whales forehead) as Cox's.

My favourite of the "Cox"ian Squalodons is Rob van Assan's version here. Again we see the same general head configuration with the long beak and very small round melon organ.

Not that I'm saying one has to reinvent the wheel with palaeo-art, especially if a pioneer artist captures something scientifically critical to an animal in their earlier version. However Squalodons' heads did not necessarily look like this. Dr. Fordyce has directed me to create a completely novel vision of Squalodon compared to the Cox idea (wait for this in Part 4).

Highlighting the fact that the look of Squalodons is not completely agreed upon, you'll notice Mr. Assan has put his own spin on the Dolphin. Instead of a dorsal fin he has added a river dolphin (the closest living relatives of Squalodons) ridge along the back. This gave some food for thought, and prompted Dr. Fordyce's opinion on the fin (again coming in Part 4).

A radical departure from the Cox model, is this rather Bottlenose Dolphin looking Squalodon by the Aquaheart Museum (as the majority of this site is in Japanese which I don't read, I couldn't find an artist's name. If you know the artist who created this piece of art please let us know in the comment section or email us at artevolved@blogspot.com.)

Though pretty much everything about this piece runs against what we know of the Shark Toothed Dolphins (in particular the lack of said shark-like teeth) as it is trying to mimic a modern Dolphin, the extant looking melon organ turns out to make this one of the key Squalodons I came across.

The best two sets of references I found combined aspects of both styles. The one set of pieces by Chris Gaskin I was asked not to post, as they are the property of Otago University. Chris Gaskin created the pieces for Dr. Fordyce in the 1990's, and so I found them a good guide to what the good doctor would want in his renditions (though as I'd find out, Dr. Fordyce's views on Squalodons have changed in the last 15 years).

The other pictures, such as the Waipatia above (a relative of Squalodons), came from a book accompanying a fossil whale exhibit from Japan. Sadly I only had access to Dr. Fordyce's copy, and the majority of the writing was in Japanese, so I was unable to get the artists name. If you know the artist who created this piece of art please let us know in the comment section or email us at artevolved@blogspot.com.

In both sets of pieces the long unusual snout of Squalodon and its enormous teeth are mixed with a much more modern Dolphin face (unlike the basketball Cox look).

Of course had I not been working with Dr. Fordyce my decisions as what to take from these different interpretations would have been difficult. It illustrates the common problem with palaeo-restorations already covered here at ART Evolved. When looking at references with no proper scientific input, it can be tricky.

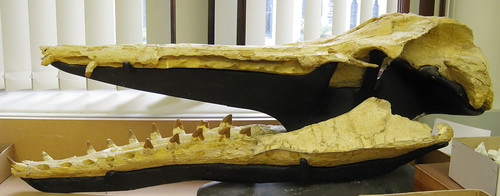
The most trust worth reference you are ever going to get is the fossil material itself. In my case this was just the skull. Only a few complete Squalodon skeletons have ever been collected, and none were from NZ or easy to access from here.

With each new approach I've taken on the whale since the first (in Part 1 of Flukes) I have ended up referring to the skull more and more. By my last rendition of the Squalodon (coming up in Part 4) the skull was my centre referral point. Which would be my other key piece of advice...

Rule #4 of Scientific Restorations: No matter how other references you find and how much you like other artists takes on a subject, always make sure the original fossils are your main guide. This way you can separate the "facts" in your other references from the "artistic licence and/or style" flavouring the artists may have injected into their piece.

So coming back to my art. This was the Dolphinsauriod. Despite its reptilian flavour, many of the key Squalodon features were starting to take form. I had the long snout, I had the large teeth (though at this stage they were a little too exaggerated), I had something of a melon organ (though not correct in Dr. Fordyce's opinion).

A rough comparison between the Dolphinsauriod and the skull showed that my snout was not quite long enough, and a new factor not mentioned on the other restorations before (as they all got it correct) was the eye was far too high on the face.

The other key issue, causing my whale to look more like a marine reptile, was how I was lacking a proper Dolphin cheek.

After referencing the Japanese artwork and Gaskin, plus some modern Dolphins, this is the fix I came up with.


Though it is quite rough in these early pics, already my Squalodon was looking a lot more mammalian. It was these finer tune details that I would learn much more about in the coming months and attempts.


For the time being (at the time) putting the teeth back into the skull made difference between mammal version 1 and Dolphinsauriod quite remarkable, despite the lack of polish on version 1.

Using my very crude model to fossil comparison, the new model was looking good. This technique however was very crude, and i was going to find out that I needed a lot more fine tune work. You can check out a preview of my new method of art to fossil comparisons here.


Finally I was onto the base of the good copy...

Of course that still wasn't quite the same as having the good copy...

More on that in Part 4!
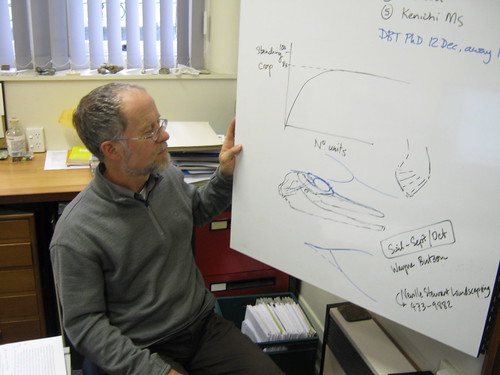
Tuesday, November 17, 2009

Reconstruction Tips: Extant Referencing

Welcome to yet another edition of...

Today we bring you the first ever self contained Reconstruction Tips.
I [Craig if your wondering] share some tricks that helped with my biggest palaeo-art achievement yet.
`
I owe it all to this piece by Julius Csotonyi entitled "Tylosaur and KT Event".
`
I have been obsessed with Mosasaurs for the past decade or so. I just find the idea of marine Monitor Lizards (and/or possibly limbed Snakes...) fascinating. I mean come on, a Komodo Dragon with flippers that swam around taking on sharks, how is that not the coolest thing ever?
`
The thing is I had never found a restoration of a Mosasaur I was ever been 100% happy with. Don't get me wrong, there are some great Mosasaur recreators out there. Dan Varner in particular deserves special mention, as do the CG ones from both Nigel Marvin's BBC Sea Monsters and National Geographic's Sea Monsters (apparently you have to name any moving picture project with a Mosasaurs in it Sea Monsters... not that I disapprove ;P ). Yet few recreations of these marine reptiles have ever completely satisfied me.
`
Then I found this Csotonyi piece, and the reason for this dissatisfaction slammed me in the visual cortex. No one (until Csotonyi) had ever tried to completely tie a Mosasaur to its Monitor Lizard roots. Despite the bold new direction he'd taken, I felt that Mr. Csotonyi's concept could be taken a little further...
`
Of course a concept is easy to picture in ones head. Getting it out of the mind and into the material world for others to see, that is the trick.
`
How was I to take my friend here, the Australian Perentie Monitor (Varanus giganteus), and essentially turn him into a Mosasaur? (I choose the Perentie as I have several great reference pictures of a stuffed one in the Sydney's museum, and I love its colouration. If I had better pics of the Nile Monitor (Varanus nilotictus) it would have been in close contending).

This is the answer I came up with to this challenge.
`
Now as I'm sure many of you know, I am typically dislike to outright hate my own work. With my Tylosaur here I'm not just pleased with this critter, I'm down right proud of it. I somehow managed to arrive at nearly the exact point I aimed for!
`
It was not outright luck that brought me to this conclusion either. Rather using a combination of artistic skills (I've been building through the motivation provided by ART Evolved), and more importantly the judicious application of referencing and scientific research.
`
Though this Tylosaur model is miles ahead of my Squalodontid whale, it owes its existence to the lessons I have been learning through my whale mistakes (read about those in my Flukes series of articles). I'm jumping the gun a bit, and this article is essentially a preview Flukes part 3 (coming soon), but with better illustrations.
`
As a quick aside for you more technical minded people, I accidental refer to my Tylosaurid here as a "Mosasaur" a lot. This is a force of habit from tour guiding, where I simplify rather then specify things. I use the term Mosasaur in the overall family sense, and by this logic I am correct as Tylosaurs were just a specific branch of this family. In cases where specifics I mention are only true about Tylosaurs and not other Mosasaur subfamilies compared to Monitor Lizards, please keep this habit of mine before losing it at me. Thanks :p
`
Before I could start on Monitor Lizarding a Mosasaur, I had to understand how both animals were put together. What were their similarities and their differences?
`
Skeletal references are the only way to understand these, and as of such I tracked down as many of these for both groups as possible. Fortunately Monitor Lizards and Mosasaurs have a healthy representation on the net. Not all non-Dinosaur prehistoric creatures enjoy this (like say Squalodontid whales!), and it can really slow you down with obscure critters.
`
When acquiring these references from the internet it can be quite hard to find pictures of the right or comparable angles for direct creatures and fossils.
Hint! Whenever you are visiting a zoo or museum take as many of your own reference photos as you can! Of anything and everything that you find interesting, as people on the web may not have the same tastes as you!
`
I focused most of my effort on the skulls, as I've been learning 75% of a solid restoration relies on its head, and Mosasaur and Monitor Lizards differ post cranially in some drastic ways (especially in the neck region).
`
As I was aiming for my Mosasaur to look as much like a Monitor Lizard as possible, I also required a fleshed out Monitor Lizard to visual focus my effort on.

So here is a rough flow chart of my initial findings of Tylosaurs vs. Monitor Lizards.
`
Hint! Before comparing references make sure you pick one common parameter to scale them on. In this case I picked the length of the skull, but I could have instead chosen the height. It is important to pick a single parameter, especially when using more than two references. Otherwise you may get some of the details wrong.
`
Modern Monitors' heads are much taller proportionally then the Mosasaur. You can see this in the middle of the chart where I have overlay en the Mosasaur skull over both the Monitor's skull and head. To accurately use the Monitor as base of a believable Mosasaur I was going to have to alter it to match the Mosasaurs dimensions.

Photoshop-like programs are an incredibly helpful tool in comparative anatomy research. I'm talking about before you ever tackle the art end of a project mind you, no matter your medium. There is just so much you can do to your references within these programs.
`
Hints!
`
Here are some of the good things to keep in mind when bring your references into Photoshop:
  • Always copy and paste your references into a new file. This way if you screw up or heavily alter anything you don't have to re track down your baseline reference. This might sound simply, but forgetting it even just once can be devastating (especially with your own personally collected references!)
  • Put each element into its own [raster] layer. This way you can easily control and manipulate each reference without effecting the others!
  • Remember when saving these files to make a Photoshop file version so that your layers remain separate. If you forget to do this, and save them as a jpeg of gif your elements will merge, and you will have to separate them again (if they don't overlap!)
So the Monitor lizards were too tall (with my chosen parameter of skull length). Easy enough. I went in with photoshop and reduced the height of my Monitor so that it roughly matched my Mosasaur. You can be as picky or accurate as you like matching these up, but I just needed approximate.
`
All I was trying to see was how and where the skulls matched and mismatched. They had their mismatching areas I had to keep in mind, but overall they aligned spectacularly.

Hint! To really see how things align, remember your layer transparency settings! These are incredibly handy for looking through one reference onto others directly behind it. If you keep your references on separate layers, transparencies do not have to be permanent either. You can just lower or restore the transparency as needed.

A similar adjustment to the fleshed out monitor skull, and I had a solid visual of what I was aiming to create.
`
Here is the flow chart of the various comparisons I did with the Mosasaur skulls. I omit here the same tests and checks I did with the photoshopped Monitor Lizard skull.
`
With my altered fleshed out Monitor Lizard head reference I got to work sculpting and modelling this counterpart 3D Mosasaur. To follow this artistic process click here to follow my WIP posts of this work.
`
Along the way I of course did several double checks to ensure my Mosasaur, though modelled after a Monitor Lizard's head was still matching my Tylosaur skull. (The overhang on the chin is my saving a bad version of this comparison. The Mosasaur skull overlay is slightly too big, in both length and height in this particular image. I forgot to save one of the good takes, but you get the idea I'm hoping).

All things considered, I think I did a pretty good job. Not perfect mind you, but that is partially lighting (this Mosasaur is currently bathed in modelling light, unlike the artistically lite stuffed Monitor Head in the museum), and I still have some fine tune modelling of wrinkles and folds to do.

So look for this fellow in the upcoming Palaeo-Environment!

Hope this look at using extant references was a help, and gives you some ideas for your own restorations!