, it did result my in learning a lot about posing a non linear 3D structure. Or in other words, it was
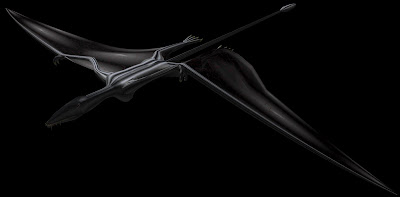
 Here is the finished piece, for reference.
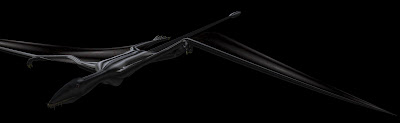
So you'll notice that each Eudimorphodon is in a different and unique pose from the others.

They didn't start this way!
`
This is what and each of the three looking like in the beginning. Flattened and rather boring. I built them like this so I had a nice default model to start with, and thus not have to rebuild each individual Ptersaur from scratch.
The simpler solution to posing three different Pterosaurs would have been resculpted this model three times. Now I say simpler, in the sense of 3D knowledge. All you have to able to do is create objects in the program, as opposed to knowing the tools and options the program lets you use on these objects once they are made.
The resculpting approach is a lot of work, and would leave me with only the three poses. I'd have to repeat the process again for each and every new pose I might want in the future.
Making this resculpting option even more unattractive for a Pterosaur are its wings. Being made of both the arms and wing membrane, sculpting and modelling these two to match was a pain in the neck in the flattened pose (getting their front curvatures exactly the same in particular). I don't even want to think about having to worry about the bend in the wing too!
Lucky for me there is pretty powerful weapon in my 3D arsenal that was going to make things easier. A 3D "skeleton" rig...
`
Before I jump into the complex problem that was a Pterosaur wing, I'll give you the quick 101 on rigging (I personally have only just graduated to the 200 or 300 level... I'm aiming to enter my post grad level by this time next year :P).
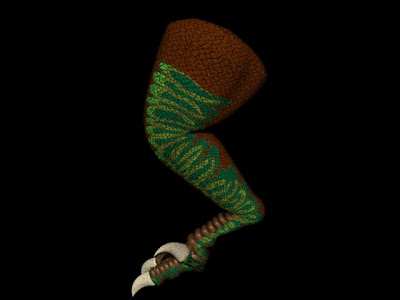
Let's say I build this nice Dinosaur leg... funny enough I actually did, come to think of it ;)... The leg itself and the individual toes are all solid pieces. Apart from where the back end of the toes meet the ankle there no inherent joints in this model. Meaning as is there is no way for me to pose anything other than which way the toes will be pointing from the ankle.
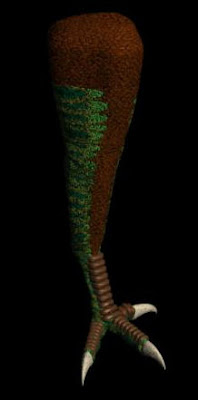
Here is rendered, but it does not look very life like.
`

I could manually resculpted the pieces of the leg to simulate joints. Do not mistaken me though. This is not to say my model actually gains joints out of the process. Rather all I've done is go into the legs model and put a kink in it were I think a joint should be.
`
As this is not a real joint, many things happen. If you look at where the knee and ankle joint bend they just just don't look right. Unless you spend a lot of time with this sculpting a leg is not going to look like it is bending properly.
`
Another problem is that when I make my bends I can easily lose the length proportions I established on the unposed version. Meaning that if I'd put in proportions I'd measured from references (which on this model to be fair I just eyeballed... from a skeleton mind you, but I didn't precisely measure) my model can quickly become inaccurate.
Lastly my detailing doesn't move with the resculpting. So all the individually modelled toe scales don't follow or reorient with the leg and toes when I repose them. Meaning I have to go in and manually reposition each and every single one of them back onto the leg and toes...
`
Which adds up to a lot of wasted time, when you consider there is an "easier" way. Well easier for linear things like legs anyways.
`
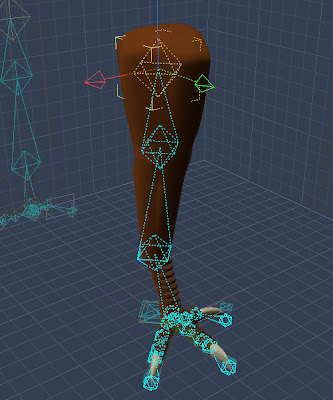
That is of course skeletal rigging. What it does is allow you to define specific points within a 3D object that now act as points of articulation and rotation. In short it creates a real joint.
`
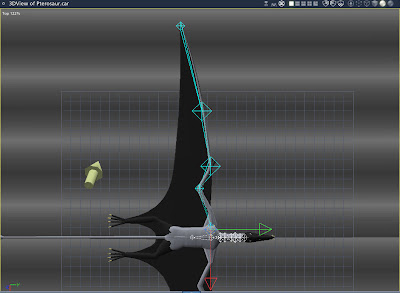
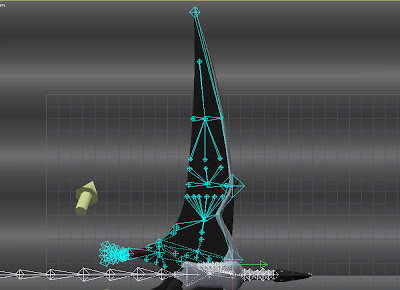
Each of the blue diamonds you see in this screen shot are called "bones". It is better to think of them as bone ends though. The diamonds becomes the point of rotation, and are where you model will bend at once the rig is "linked" to the objects. The lines connecting the diamonds function like real bones in that they are in movable (beyond the diamond points of rotation) and are solid.
`
Bones come with their own costs though sadly.
`
The first and foremost is that you can no longer modify or
resculpt any 3D objects connected to the skeleton. Meaning you have to make sure the model is exactly the way you want it before rigging it.
The other big setback is that rigging a model eats up a lot of computing power and memory. So not only does it take longer to do things within the program, but your model tends to triple in file size.
Despite these inconveniences they make posing animal models SO much easier in the long run!
Once applied to a model you simply have to grab one of the diamonds and you can instantly and
conveniently bend your model at the desire points.
Bones also simulate the manner in which you body moves. If I swing hip bone then everything connected below it move... Though if I just move the ankle then only the toes should move with it.
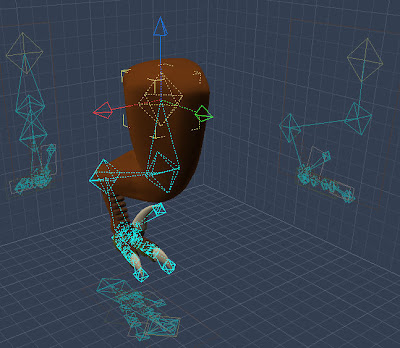
After rigging and posing we get something much more life like!
Skeletal rigs take care of all the problems I mentioned before.
The first and foremost is the ease of bending the model.
Resculpting each piece takes forever! Plus if you don't get it right you have to start all over again... With the skeleton you can create a new pose within a few seconds!
`
Another huge difference, which wasn't obvious to me till I made the change over, the limb proportions are strictly maintained. When manually changing a model it is easy for you to get the length of limb segments wrong when their angled. Just compare this rigged leg to my resculpted one from before you'll see how wrong I was when trying to rescultpt the ankle.
`
Lastly all my detailing are locked onto and part of the whole rig. So the leg and toes move their detailing claws and scales move with them.
`
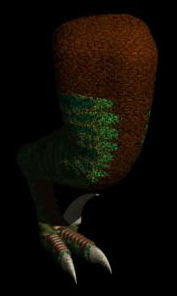
However if you look closely at the killer claw on this particular render you'll notice the one glitch I'm fighting to still overcome.
`
Bones and their points of rotation are fantastic on single linear objects. However when they interact with single small or non linear objects they have a tendency to stretch them in none realistic manners. It makes sense in the computer world, but takes some retooling of your logic as it is completely at odds with what you are used to in the material world.
`
My
Pterosaur become the greatest challenge to my mode of thinking 3D vs. real world. When you think about a Pterosaurs wing membrane it is about as non linear an object as they come!
`
A Pterosaurs wing would have been an elastic object, and thus would have been effected and moved by many conflicting parts of the body (unlike the nice linear leg, the knee bone to the ankle bone connected to the toe bone etc.). Sure the majority of the wing should rotate up and down with the arm. However what about the bits that connect to the side and the leg?
`
Above is the first rig setup I tried on my Pterosaur, wishfully thinking that the wing membrane would behave like a perfect elastic if I merely defined the arms natural range of motion. Sadly I was about to learn in the virtual world you have to define a lot more then just the "real" points of rotation in a creature.
`
Not defining any "bones" in the membrane meant the computer could just bend and stretch it
wherever it was easiest to do so. Resulting in this bizarre tenting effect.
`
Lesson learned. I was going to have to stop thinking of the wing membrane as real life elastic substance, and more as an extension of the wing through which the skeleton was going to have to expand and define.
`
I had my fears that this was going to get complicated (I hate it when I'm right, but we'll get to that in a bit). Just so I would knew, I tried a minimal fix to the problem.
`
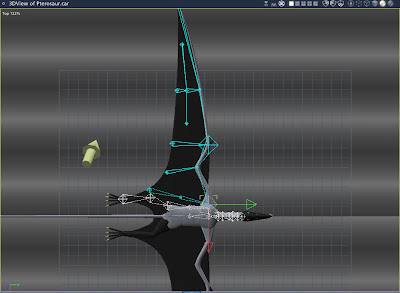
I tried a single extension straight out from each major joint (except you'll not the top of the wing flap... which is a preview to how I was going to have to solve this) to see if it would define the bending and stretching seams for me.
`
The reasoning behind my logic is that each of those lines connecting the diamonds is an unbendable unmovable (except through rotation) section of the 3D object. If I bent the mid wing joint my hope had been that the tenting of the first rig would be force onto my now defined unbendable seam. In other words the tenting wouldn't look weird, because it'd be on the point where all the bending should be.
I was half right it turns out. Yes the wing bent perfectly at the
midwing seam both on the arm and by bone extension all the way out to the edge of the membrane at the middle of the wing. As the computer didn't have any
definition for the surrounding membrane however it found it easier to bend the wing bend just outside where I'd rigged!
Well the solution was "simple" enough, in logic, not in action. I was going to have to completely define and rig the whole surface of the wing membrane. Resulting in a rig that didn't so much resemble a vertebrate animal, but rather a weird
exoskeletoned creature of some kind. If you were to think of all my 3D "bones" as a real skeleton that is.
The trouble there was I'd only been worried about the tenting and distortion with the wing in relation to the arm moving up and down. I hadn't paid any attention to the membrane's interaction and manipulation where it linked to the legs and body...
`
I was getting terrible distortion.
`
So once again I had to go in and add a dozen branching off membrane "bones" to help define and control the distortion along the legs.
In the end I had a pretty good "simple" rig that allowed me pretty good fluid control on my
Pterosaur. I say simple in its use. I only have 5 major points (outside of posing the toes) to worry about.
It wasn't perfect (as none of my 3D
skeletoning jobs are... remember I'm only a beginner to
intermediate in their use so far). I couldn't bend the legs too much or the tenting would come back along the back edge of the wing. I also found that if I curled the inside toes to much a really weird tug line would appear all the way from the toe up to the chest...
`
So I had to be a little restrained in my poses.
`
Despite all this, and the mediocre piece it produced, I did learn a TON about my program's 3D rigging!
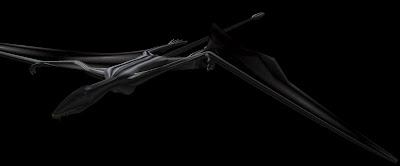
As a very quick aside, the inside joke of the photo these Pterosaurs are flying over is that they are fishing over top of some petrified trees. This is a photo of a famous petrified forest here in New Zealand.
There is a long fallen fossil log running between the far left Pterosaurs, a circular tree stump just above the bottom Pterosaur's left wing tip, and another circular stump in between the top two Pterosaurs in the upper middle.


 My Pterosaur become the greatest challenge to my mode of thinking 3D vs. real world. When you think about a Pterosaurs wing membrane it is about as non linear an object as they come!
